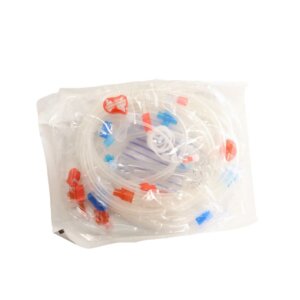
Blood Tubing is an essential component of dialysis procedures, ensuring a safe and efficient transfer of blood between the patient and the dialysis machine. In Kenya’s healthcare industry, understanding how to properly prime blood tubing is crucial for preventing contamination, maintaining flow consistency, and optimizing patient outcomes. At Medocal Limited, our goal is to make dialysis procedures smoother and safer by providing high-quality Blood Tubing and other top-tier Dialysis Products in Kenya.
Priming blood tubing is more than just filling a tube with saline solution; it is a vital process that removes air and potential contaminants. Below, we will walk you through the best practices and detailed steps to prime your blood tubing effectively. By following these guidelines, you will help safeguard patient well-being and enhance overall procedural success. Whether you are a medical professional looking to sharpen your skills or a dialysis center manager seeking reliable resources, this guide aims to provide the clarity and confidence needed to handle blood tubing correctly.
Before diving into the step-by-step method, it’s essential to understand why priming blood tubing is so important:
To successfully prime your blood tubing, gather the following:
Ensuring you have all the necessary tools within arm’s reach will streamline the process. This helps maintain a sterile environment and reduces the potential for errors. For additional tips on assembling a comprehensive dialysis kit, you might find our 5 Essential Components of a Dialysis Kit article helpful.
Below is a detailed, step-by-step approach to priming your blood tubing effectively:
Begin by washing your hands thoroughly and donning appropriate protective gear, including sterile gloves. This step is critical in minimizing the risk of cross-contamination. Make sure your work area is clean and all supplies are readily accessible.
Connect the arterial and venous lines of the blood tubing to the appropriate ports on the dialyzer. Double-check that each connection matches the color-coded or clearly labeled ports on your specific dialysis machine and the dialyzer. Proper alignment at this stage prevents air leaks and helps ensure safe fluid dynamics.
Before introducing saline, clamp the venous and arterial lines. Verify each connection’s tightness to avoid leakage. At this point, all ports should be tightly fastened and sealed against external air. If you have any doubts about the attachments, recheck the manufacturer guidelines or consult a senior healthcare provider.
Begin the flow of saline solution into the arterial line. Gradually release the clamp on the arterial tubing to allow the saline to enter. As the solution travels through the dialyzer and into the venous line, watch carefully for air bubbles. Gently tap the tubing to help dislodge any trapped air and guide it out.
Observe the fluid flow rate as you unclamp the venous line, letting the saline exit into a waste container. Keep an eye on the transparent segment of the tubing to spot any lingering bubbles. If you notice bubbles collecting, momentarily slow or stop the flow, tap the tubing, and let them rise to the top so they can be expelled. Continue until you see a clear, bubble-free stream of saline running through the tubing.
Inspect the entire length of your blood tubing and all connection points for leaks. Even a small leak can jeopardize the sterility of your setup. If any leaks are discovered, clamp the tubing immediately, remedy the issue, and re-prime if necessary.
Once the tubing is fully primed and free of air, clamp the venous line again, detach it from the waste container, and connect it to the venous return port. Confirm once more that all attachments align with your dialysis machine’s instructions. You are now ready to initiate the dialysis session.
During the priming process, minimizing contamination is paramount. Utilize sterile gloves and disinfect surfaces. Avoid touching exposed connection points and be mindful of the tubing’s external surfaces. For more insight into best practices during dialysis procedures, you can read our article on 8 Common Questions About Dialysis Kits, Answered.
Persistent Air Bubbles: Slow down the saline flow, tap the tubing, and expel trapped air.
Leakages: Check clamp positions and connections; replace or repair if necessary.
Blockages: If flow is disrupted, check for kinks or clots in the tubing.
By mastering these troubleshooting tips, you ensure uninterrupted treatment and optimal patient outcomes. If issues persist, consult the manufacturer’s guidelines or a dialysis specialist.
Properly priming your blood tubing is just one aspect of a successful dialysis session. Having access to high-quality dialysis products, including top-grade Blood Tubing, is equally important. As a leading medical supplies company in Kenya, Medocal Limited is dedicated to delivering dependable solutions that enhance patient care.
To explore our full range of products, feel free to visit our /shop/ page and discover the best medical supplies from Medocal in Kenya. From dialysis essentials to personal protective equipment, we strive to be your one-stop shop for medical solutions.

Priming blood tubing is a critical yet straightforward procedure that can significantly affect the success of dialysis. Adhering to the steps outlined above will help you maintain a sterile environment, prevent complications, and optimize treatment efficacy. By combining these best practices with high-quality Blood Tubing and other Dialysis Products in Kenya from Medocal Limited, you’ll establish a solid foundation for delivering exceptional patient care.
Blood tubing must be primed before each dialysis session to remove air and ensure sterility. If any contamination or air leaks occur mid-session, re-priming may be necessary.
It is recommended to use a fresh saline solution according to the manufacturer’s guidelines. Using previously opened solutions may increase the risk of contamination.
Slow the saline flow, tap the tubing gently, and pause the flow if necessary. Allow the bubbles to collect and escape through the waste line. If the issue persists, inspect all connections for leaks.
WhatsApp us
Drop us your email & phone no and we will share our products catalogue.
